I .jpg) obtained
my Space Shuttle from an arcade in Sea Isle City, New Jersey in the spring
of 2001. A fellow that I had purchased my Masquerade (Gottleib,
1966) from had just retired and purchased a 50% interest in an arcade at
the Jersey Shore (now thats how to retire!). If you've been to the
Jersey shore lately, you'll notice that in the towns that allow them,
redemption games have taken over most of the arcades. Kind of like
little casinos dispensing stuffed animals. Sea Isle City is one of
them, and "traditional" skill games like pinball, and even video
games, are in the minority. When the seller and his partner bought
this arcade, they had one pinball machine, Space Shuttle. He was
getting rid of it because (his quote, not mine), "its not a dot
matrix game and I don't like any other type." obtained
my Space Shuttle from an arcade in Sea Isle City, New Jersey in the spring
of 2001. A fellow that I had purchased my Masquerade (Gottleib,
1966) from had just retired and purchased a 50% interest in an arcade at
the Jersey Shore (now thats how to retire!). If you've been to the
Jersey shore lately, you'll notice that in the towns that allow them,
redemption games have taken over most of the arcades. Kind of like
little casinos dispensing stuffed animals. Sea Isle City is one of
them, and "traditional" skill games like pinball, and even video
games, are in the minority. When the seller and his partner bought
this arcade, they had one pinball machine, Space Shuttle. He was
getting rid of it because (his quote, not mine), "its not a dot
matrix game and I don't like any other type."
Never mind that I think
Space Shuttle could still earn if maintained (the theme still holds true
today). His short sightedness was my gain. The game worked
perfectly, but was extremely dirty. It looked like it had been about
5 years since somebody last cleaned the game. However, the playfield
was Mylared! We struck a deal and all I had to do was move it a
block down the boardwalk and then down the ramp to my van!
The game made it back to
the gameroom in fine shape and played perfectly from day one. The
Mylar was extremely dirty and I made the decision to remove it as part of
the shopping process.
The game received a complete shopping, almost to the restoration level.
The first step was to
strip the playfield of all the top parts:
.jpg)
Everything was removed
down to the bare wood. I did leave the ball trough mechanism on
however, as I would only be waxing the playfield, not getting it clear
coated. For Home Use only machines, I think if you put on enough
coats of wax (at least four) and keep your machine clean, the surface will
last at least as long as you do! The
playfield of the machine had been saved because early in its life an
operator had applied Mylar to the playfield before any significant wear
started to appear. There was already some minor wear around the
inserts, which most likely prompted the Mylar application. .jpg)
The
Mylar was stripped off of the playfield, not a fun job! You can read
more about the fine art of playfield Mylar removal on my Mylar
Removal Page. .jpg) There
were several applications of Mylar on the playfield, having been added at
various points in the machine's past. I removed three layers of
Mylar at the point where the ramp drops the ball back onto the playfield! The
Mylar was removed with Goo-Gone, a cleaning solvent that dissolves the
glue holding the Mylar onto the playfield. All
of the exposed metal on the playfield  was was
dumped into my tumbler for a couple of days to clean it up. Note
- Before taking one post off of the playfield, I took about 30 photos of
the playfield from every angle possible. Unless you have a spare
fully populated playfield to use as a reference, you will not be able to
put it all back together again! 
All
of the posts were put into the dishwasher and came out looking like new. I
was lucky enough to have been able to find a set of NOS Drop Target decals
for the game. As you can tell from the photo on the right, the
single Drop Target (at the base of the ramp), had seen plenty of use! .jpg)

.jpg)
After
the Mylar was removed, the playfield was given 4 coats of wax and then
reassembled. All lamp sockets were removed and cleaned, and all
bulbs were replaced with new #47 bulbs.
The pop bumper assemblies were rebuilt, with all new parts, including new
lamp sockets. The
flippers were also rebuilt, with the proper coils installed. The right
flipper had a more powerful coil that caused numerous airballs, replacing
it with the proper strength coil vastly improved the play of the game -
moral of the story - a stronger coil does not necessarily mean better
flippers! Here
are some photos of the completed game: (click on the photos for a larger
image) Playfield
Lower Left: .jpg)
Playfield
Lower Right: 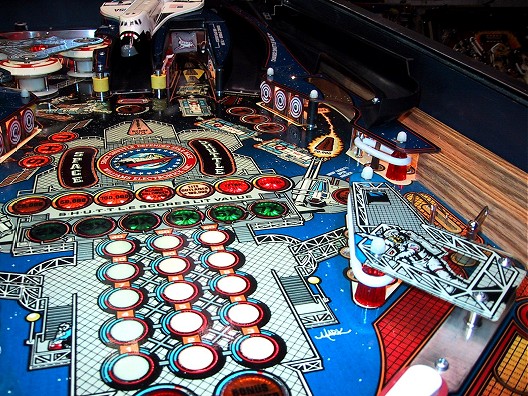
Playfield
Upper Left: .jpg)
Playfield
Upper Right: .jpg)
Entire
Playfield Shot: .jpg)
| 
.jpg)


